Using Cygwin for batch operations under windows
1 Getting & installing cygwin
- go to http://www.cygwin.com/
- look for this image
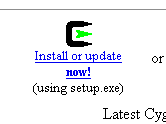
- click on it to download setup.exe
- find setup.exe and double click on it
- click next
- click next, (leaving "Install from Internet" selected).
- click next, leaving the options as they are, change c:Cygwin if you want, but the rest of this tutorial relies on cygwin being there, so beware!
- click next, remember the temp directory, you can delete the contents when setup.exe is done.
- change any proxy stuff if you need it, if not just click next
- setup.exe will download the list of mirrors.
- choose a mirror near you, ftp://ftp.mirror.ac.uk is good if your in the UK.
- setup.exe will download a list of packages
- now your at the package selection list, the UI here is a bit weird, so pay attention!
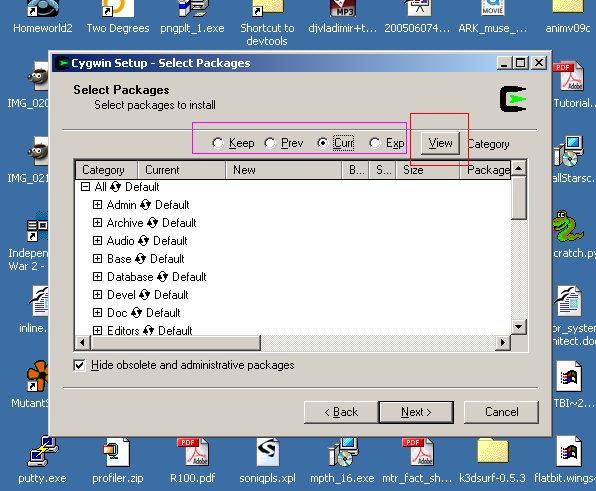
The "View" button (with the red square around it), toggles what is viewed in the package list, it has 5 modes:
Catagory
this shows all packages available, including ones what are installed, in this screen shot you can see the list of "Archive" packages, it contains archiving tools like unzip, zip, and tar (the main archiving program for Unix systems).
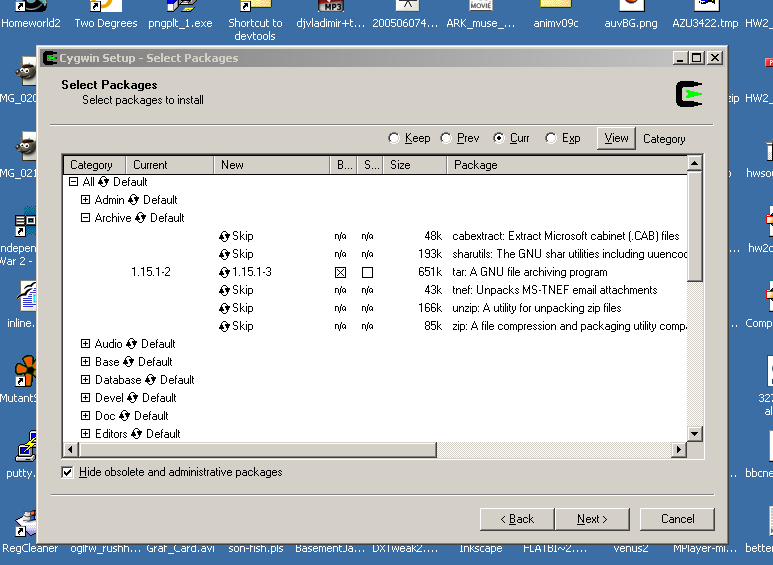
In the "Current" column you can see that I have version 1.15.1-2 of tar installed, and in the "New" column that version 1.15.1-3 is available - this package can be upgraded! The "B..." and "S..." column are "Bin?" and "Src?" we currently have the Binary package installed which is why there is an X in the column. If, for some reason, we wanted the source code to tar to be installed we could select the "Src?" column too, but we don't so we can leave it.
Full
The "Full" view lists all packages, it's less useful than the catagory view, i don't use it much.
Partial
This is very useful - it tells you what cygwin will do when you click next, in my case it lists a load of packages to be upgraded.
Up-to-Date
This lists all installed packages that are up-to-date.
Not Installed
This lists all packages you don't have installed
Switch to the Catagory view,
1.1 Choosing some packages to be installed
Cygwin comes with some basic tools, but we need a few more.
Cygwin uses the windows dos prompt as a default terminal, this doesn't work too well, so the first thing we're going to add is rxvt:
Switch the package view to "Catagory", and click the + next to "Shells" (you may have to scroll down to find it).
look for "rxvt: VT102 terminal emulator for ...".
click on the elliptical arrow chasing an arrow icon thing in the same row.
The text in the "New" column should change from "Skip" to a version number, it was 2.7.10-6 when i wrote this.
Thats it for rxvt, it will be installed when you click next, but first lets find some a few more useful things.
Click on the "-" next to "shells" to close it, then click on the "+" next to "Graphics".
Scroll down past all the "lib" packages until you find netpbm, and again click on the arrow thing, and do the same for netpbm-doc and ImageMagick.
The NetPBM toolkit is a hub and spoke file converter - it uses a set of simple bitmap file formats (Portable BitMap's, hence the name PBM) and has converters that convert from most popular bitmap file formats to pbm and converters from pbm to may popular formats, we'll be using it later.
ImageMagick is also a bitmap file format converter, and much else besides.
Next go back to the archive directory and select unzip.
Now click next, the installation will begin, note that the packages we've selected rely on many other packages to work, cygwin will install those too.
Don't bother with a desktop icon, we'll make one using rxvt.
Don't delete the setup.exe application, you'll need it if you want to upgrade any of the cygwin packages, or to install new ones.
1.2 After the installation:
Now we're going to configure rxvt, this is what we'll run to use cygwin.
open windows explorer and go to C:\cygwin\bin, scroll down until you find rxvt.exe, right click on it and choose Create shortcut.
Now right click on the created shortcut and select cut.
Now paste it where you can find it, I prefer the Quick Launch tool bar, you may prefer the Desktop or somewhere in the Start Menu.
Right click on the shortcut after you've pasted it where you want it to go, and select Properties.
In the Shortcut tab edit the Target field to add:
-sl 1500 -fn "Lucida Console-12" -bg black -fg grey -sr -e bash --login -i
make sure there is a space after rxvt.exe and -sl.
Then click OK.
The flags we've added to the rxvt command line do this:
-sl 1500 : adds 1500 lines of scroll back history, useful to see what previous commands did.
-fn "Lucida Console-12" : Changes toe font to a nicer one, well I think it's nicer anyway.
-bg black -fg grey : changes the terminal background to black and foreground to grey
-sr : puts the scroll bar on the right, windows style.
-e bash --login -i : this runs the bash shell with the -i and --login arguments, this sets it up as an interactive login shell, without these it won't read the proper startup lines and won't be as useful.
1.3 sorting out your home directory.
If your windows user name has spaces in it then some command line tools will have problems, in order to change this use explorer to go to C:\cygwin\etc and edit the passwd file with a text editor, use Wordpad, not notepad - notepad doesn't understand Unix line endings.
(If you're looking for a decent text editor for windows I can recommend SciTE)
Each line in the passwd file is a : separated list of fields, we're interested in the 2nd last field in the line starting with your user name, the last 2 fields will look like this:
:/home/User Name:/bin/bash
change it to:
:/home/UserName:/bin/bash
(i.e. just remove the space), then go to C:\cygwin\home and rename the User Name directory to UserName.
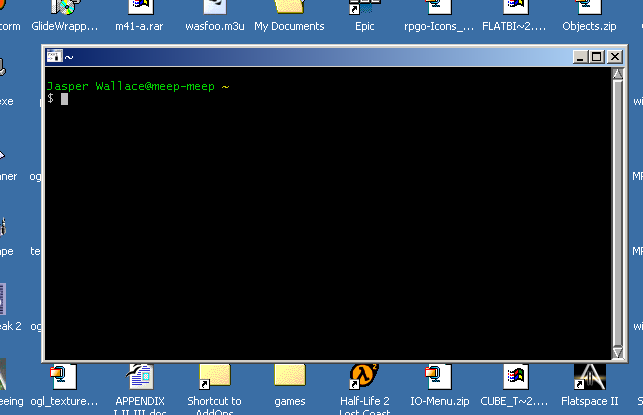
Now double click on your rxvt shortcut, you should see something like this:
2 Some notes on the Unix shell
2.1 pattern matching
Pattern matching is any method of specifying wild cards when searching for something and having the computer produce a list of matching things, You'll probably be familiar with the DOS style DEL *.TXT where * matches more than one character, and ? matches a single character. This style of pattern matching is called globbing under Unix, more on this later.
2.1.1 dos vs. Unix shells
The DOS or windows command line shell is, in some ways, fundamentally different from the Unix one, the main difference is in the way globing is performed.
Under DOS when you run something like:
DEL *.TXT
The *.TXT is passed unchanged to the program and it's the programs responsibility to make sense of it. Under UNIX the *.TXT would be expanded by the shell to the list of matching files and then the list would be passed to the application, so if you had:
NOTES.TXT
ICON.BMP
README.TXT
APP.EXE
in a directory, typing DEL *.TXT in a Unix shell would cause the shell to expand *.TXT to then run DEL NOTES.TXT README.TXT.
Another thing about the Unix shell is that there several to choose from, cygwin comes with the bash shell by default, it's the one most widely used on Linux systems.
2.1.2 globing
globing is the simplest form of pattern matching used by Unix. it's pretty much the same as used by DOS, but in addition it supports character sets.
* matches anything and ? matches a single character, if you want to match the * or ? characters you need to escape them with a backslash: \? matches a ? and \* matches a *.
Character sets are specified by using [ and ] - [AB] matches A or B for example.
You can also specify ranges by using '-', [A-Z] matches any capital letter, [0-9] matches any number, etc. you can also use [:class:], where class is:
upper: for upper case letters digit: for numbers lower: for lower case letters
There is more about this in the bash man page (see below for more info on man pages), search for "Pattern Matching" (in the man page, not in this document!).
2.1.3 regular expressions
Regular expressions are a much more powerful and flexible pattern matching mechanism, and whole books have been written about them. They are very popular for web development and are now fairly widely used, I'll go into more detail about them later.
There are plenty of regular expression tutorials on the web.
3 Getting help
cygwin has extensive on line help, for various historical reasons there are two help systems, the "manual pages", usually just called man and the GNU info system.
3.1 On line help
3.1.1 man
man is the original UNIX on line help system, and it really shows in it's teleprinter style. To use it just type:
man subject
Since we're using bash try:
man bash
use the space bar to scroll down a page, the arrows keys to go up and down a line, page up and page down scroll up and down a page, and the 'b' key also goes back a page.
If you've read the globing section of this tutorial you might be interested in the Pattern Matching section of the bash man page, to search for it, press '/' and then type Pattern and then hit enter, to find the next match press 'n', you'll need to press it twice to get to the pattern matching section.
Note that the program thats letting you search through the man page isn't the man command. The man command formats the manual page and passes it to a command called less. This is a generic text file viewer, to get more info on less press 'q' to quit man and get back to the prompt, then type:
man less
to see the man page for less.
3.1.2 info
There is a more recent standard for UNIX documentation called info, it's mainly used by for programs written by the GNU project (who amongst other things wrote gcc, the GNU C Compiler that's the main compiler used by the open source movement).
info works differently from man - you move a cursor around with the arrow keys and press enter to follow a link, you still press 'q' to quit.
info documents have a hypertext structure which makes them a bit more rational, since both bash and less come from GNU you can read about them with:
info bash
info less
info it's self has an info page, which you can see with:
info info
3.2 keyword searching
3.2.1 whatis
All the installed man pages can be searched for a keyword using:
apropos keyword
(you can also use man -k keyword, it's easier to spell).
In order to make the search faster the computer needs to build a database of all keywords, we'd better do this now:
/usr/sbin/makewhatis -v
It will take a few minutes.
Unfortunately cygwin doesn't build the database for you automatically, so you'll have to remember to do it each time you upgrade or install any new packages.
4 some basic commands
4.1 a note on your home directory.
cygwin creates a home directory for you under C:\cygwin\home\username, this is a different directory from your windows profile, since you're going to be doing as lot of stuff in there it's worth finding it in windows explorer and creating a shortcut to it on the desktop, or in the explorer favourites menu or links tool bar.
4.2 changing directory
the cd command changes directory:
cd directoryname
plain cd on it's own takes you back to your home directory.
cygwin uses / as a directory separator rather than dos \, it also maps the dos drive letters to /cygdrive/<letter>. You can see a list of these with the mount command
4.3 which directory am i in.
pwd
prints the current working directory. The directory is also displayed in yellow in the bash prompt, if the directory is a subdirectory of your home directory then it will be prefixed with '~',
4.4 making directories
The mkdir command makes directories.
4.5 deleting directories
rmdir deletes directories. they need to be empty first.
4.6 listing files
ls lists files, ls -l gives more info, ls -t sorts by file creation time, ls -S sorts by file size.
4.7 deleting files
rm deletes files. WARNING! rm deletes things without prompting for confirmation! Use rm -i to get prompt asking whether you actually want to delete stuff. You can edit your .bashrc to always make rm use rm -i, see below.
4.8 moving (renaming files)
use mv
4.9 copying files
cp copies files.
5 Important note on filenames under Unix
By longstanding tradition file and directory names under Unix are case sensitive. Watch out for it, it's easy to miss sometimes.
6 The Unix command line in more detail
6.1 stdin, stdout, stderr
Programs on the Unix command line have 3 data streams, stdin, stdout, and stderr.
stdin: "Standard input" this will either be what your typing, or the output from another program, or a file. stdout: "Standard output" this will be printed to a terminal, but you can redirect it to another program or a file, see below stderr: "Standard Error" This is also an output used for error messages. Having stderr and stdout separate means that if your redirecting stdout somewhere you can still see the error messages and they don't get mixed up in the programs output.
6.2 pipes and redirection
You can pipe the stdout off one program into the stdin of another by joining the programs together with the | character:
program1 | program2
the most common use of this is to pipe things to less, try:
cd /bin
ls -l
You'll notice that there's a lot of files in /bin, and they scroll past too fast to read, if you change the ls to:
ls -l | less
you can now page back and forth through the file listing as you can in when using man.
redirection is used to pipe program input or output to a file:
program > file
dumps stdout from program to file - the file will be overwritten if it exists.
program >> file
appends stdout from program to file, and:
program < file
pipes the file into the stdin of program.
the bash man page has a good section on redirection too.
6.3 head and tail
Another two useful programs to pipe things to are head and tail. They both display a number of lines from either the beginning or the ending of whatever is fed to them.
To see the 10 biggest files in /bin do:
ls -lS | head -10
and to see the oldest 10 do:
ls -lt | tail -10
7 some more tips
bash has a bunch of nice features that make it quicker to use than older, more primitive shells.
7.1 command history
every command that you've typed is stored in a command history, you can use the up and down arrow keys to cycle through the history, hitting enter will run the command again.
7.2 tab completing
you can type part of a filename and hit tab, if there is only one matching file bash will complete the rest on the command line.
You can do the same with commands, try typing jpeg and then pressing tab twice, bash will list the commands beginning with jpeg.
tab completed filenames also get spaces escaped with '\ ' automatically, which makes things easier.
7.3 line editing
Ctrl-A goes to the beginning of the line, Ctrl-E to the end, the left and right arrow keys move the cursor one character backwards and forwards, Ctrl-k deletes from the cursor to the end of the line, Ctrl-w deletes from the cursor to the next white space to the right.
Text thats been cut with Ctrl-k or Ctrl-w can be pasted with Ctrl-y, you can also use the mouse for cutting and pasting, see below.
Ctrl-l clears the screen.
7.4 cutting and pasting text in rxvt
Highlighting text with the left mouse button automatically cuts it to the windows clipboard, you can paste the clipboard contents with the middle mouse button.
8 Final setup
Lets get on with the last few bits we need to setup, most of this is specific to modding EOC.
8.1 setting up your path
Rather than looking in every directory for programs bash will only search in directories listed in an environment variable called PATH, you can see it by typing in:
echo $PATH
since we want to use the various EOC mod tools with cygwin we'll need to tell bash how to find them. We're going to create a directory called bin in your home directory and dump the PSO and FTEX tools in there, don't forget that they will need the python24.dll and library.zip file too.
to create the bin directory type:
cd
mkdir bin
(the cd makes sure you're in your home directory)
To add the bin directory to your PATH type:
export PATH=${PATH}:~/bin
the ${PATH} will be replaced with your existing PATH, and ~/bin will be expanded to the full path to your home directory.
Note that this will only change it in the shell you typed it into, and won't make it permanent.
To make it permanent open your cygwin home directory and open .bash_profile with a text editor (again, use wordpad, not notepad).
There is a section that looks like:
# Set PATH so it includes user's private bin if it exists
# if [ -d "${HOME}/bin" ] ; then
#   PATH=${HOME}/bin:${PATH}
# fi
we need the if [ -d section to be run by the shell when we open rxvt, so remove the leading # from the last 3 lines so that it looks like:
# Set PATH so it includes user's private bin if it exists
if [ -d ${HOME}/bin ] ; then
  PATH=${HOME}/bin:${PATH}
fi
Since we've got .bashrc open there's a few other changes we should make.
the Unix rm command it notorious for getting people into trouble because it deletes without confirmation by default, so scroll down until you find a line like:
# alias rm='rm -i'
and removed the # so it shows:
alias rm='rm -i'
you can do the same for cp and mv if you want.
If you like colour in your terminals then uncomment some of the other lines as well, you can find out what the command line args for each program does by looking in the man pages, and of course the bash man page has a section on Aliases.
save the .bash_profile and open a new rxvt, type echo $PATH again and check that /home/username/bin is in there at the beginning.
8.2 symlinks
symlinks, short for Symbolic Links are the Unix equivalent of windows shortcuts, cygwin uses a slightly altered version of windows shortcuts, they work fine in windows, but cygwin can't use windows shortcuts made by windows, see this cygwin FAQ entry for more. http://cygwin.com/faq/faq-nochunks.html#faq.using.shortcuts http://cygwin.com/faq/faq-nochunks.html#faq.api.symlinks
In order to get to the EOC files on my system I'd have to type:
cd /cygdrive/d/Program\ Files/Infogrames/Independence\ War\ 2\ -\ Edge\ of\ Chaos/
this is fairly long winded, (even tho i can use tab completion to do most of it). In order to make things simpler i can create a symbolic link, using ln:
ln -s /cygdrive/d/Program\ Files/Infogrames/Independence\ War\ 2\ -\ Edge\ of\ Chaos/ eoc
now all i need to do is type:
cd eoc
to get to the EOC files.
9 Using all this for something useful
If you've not got your EOC resource.zip unzipped unzip it now.
unzip will dump the files in the current working directory, so you can either make a directory in your homedir or unzip it in the Edge Of Chaos main directory.
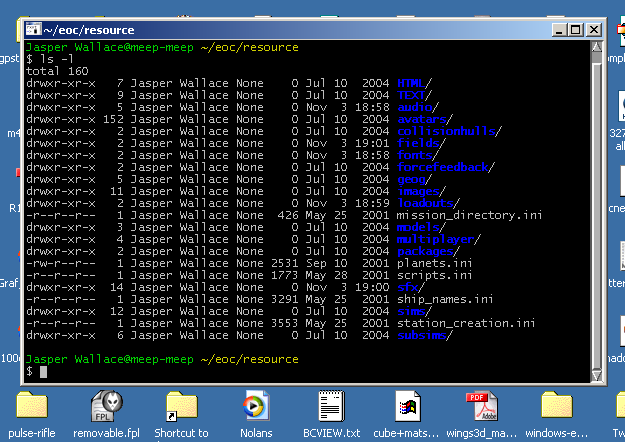
now cd into the resource directory (where ever you've put it) and type ls -l you should see something like this:
9.1 Converting all the .ftu files in a directory to .iff
lets convert all the FTEX textures for the police interceptor to .iff format:
cd resource/avatars/policeinterceptor
for file in *.ftu ; do
> echo $file
> dftex -q $file ${file/.ftu/.ppm}
> ppmtoilbm -24force -nocompress ${file/.ftu/.ppm} > ${file/.ftu/.iff}
> rm -f ${file/.ftu/.ppm}
done
Note that after the for file in *.ftu ; do line the shell will automatically print the > to indicate that your in a for loop, you don't need to type them.
So, what does all that lot do?, lets break it down line by line.
The for file in *.ftu ; do expands the *.ftu to a list of all the .ftu files in the current directory, it then goes through the rest of the loop below the for line once for each item in the list, and changes the value of the $file variable each time to each item in the list.
echo $file, echo just prints whatever arguments it's given, so this line will print out the name of each .ftu file as it's being processed.
> dftex -q $file ${file/.ftu/.ppm}
This runs the dftex command with -q as an argument (which stops it printing anything unless it encounters errors). The next two args tells dftex which file to use as input, and which to use as output.
This first is easy - we assign each .ftu file to the file variable in the for loop.
The 2nd makes use of bash's Parameter Expansion (you can read about it in the man page). in this case the ${file/.ftu/.ppm} bit searches the end of $file for .ftu and replaces it with .ppm.
We're using ppm here because dftex uses the FreeImage library for image manipulation, and unfortunately FreeImage doesn't support iff/ILBM as an output format. It can do ppm, and the netpbm toolkit comes with ppmtoilbm, which can make 24bit CMAP/BMHD iff files, which is what (as far as I know) Lightwave needs.
> ppmtoilbm -24force -nocompress ${file/.ftu/.ppm} > ${file/.ftu/.iff}
This runs ppmtoilbm, with options to force it to produce uncompressed 24bit output. It reads the .ppm file dftex made and produces a .iff version to stdout, this is then redirected to the final .iff file.
> rm -f ${file/.ftu/.ppm}
Since the .ppm files are only an intermediate step in the conversion we can delete them, the -f option to rm makes it never prompt for confirmation.
done
This ends the loop.
9.2 Converting all the .ftu file in the resource directory to .iff
The for loop we've just done only works on file in one directory, that useful to have, but sometimes we need to convert files in a much larger directory structure.
The best tool for searching through a directory structure and performing operations on files is called find.
change directory to be in the resource directory it's self:
cd ../..
now lets find all the .ftu files:
find . -iname "*.ftu"
here we run find, starting in the current directory (.) and case insensitively (-iname) looking for files matching the pattern *.ftu. Since we're looking case insensitively it will also match .FTU and .Ftu.
If you want to page through the listing rather than have it all scroll past at high speed you can pipe it to less.
Now we want to get this list and somehow convert each entry, luckily we can do this easily with our for loop.
Remember that the *.ftu was expanded to a list of files in the start of the loop?:
for file in *.ftu ; do
the any list of things where the *.ftu is will be looped over, and there is an easy way to turn the output of find into a list.
If you surround a command with `'s - like this `command` it will be run, and the `command` replaced with it's output, if the output has white space in it, (spaces, tabs and newlines) it will be split up into a list at the whitespace
This is where Unix has problems with directory and filenames with spaces in them, they get split at the spaces into different items in the list, the man page for find has some more info on this.
There is a way around this - bash splits lists up on characters defined by the IFS variable, if we set this to just the newline character it will ignore spaces and find on files with spaces will work.
To set IFS to just a newline, type IFS=" (thats a single double quote), hit enter, and then at the > prompt type another " and hit enter again.
so now all we need to do is replace the for line with:
for file in `find . -iname "*.ftu"` ; do
The whole loop now looks like:
for file in `find . -iname "*.ftu"` ; do
> echo $file
> dftex -q $file ${file/.ftu/.ppm}
> ppmtoilbm -24force -nocompress ${file/.ftu/.ppm} > ${file/.ftu/.iff}
> rm -f ${file/.ftu/.ppm}
done
9.3 Converting all .pso files to .lwo
We can do this in one step with no intermediate file, which make things a lot simpler.
for file in `find . -iname "*.pso"` ; do
> echo $file
> pso2lwo --quiet --output=${file/.[pP][sS][oO]/.lwo} $file
done
Some .pso files have a capitalised file extension (.PSO), in order to cope we use character sets - this is the ${file/.[pP][sS][oO]/.lwo} stuff.